This is tips how to create a static NAT in Palo Alto Firewall
Example NAT:
Create NAT and firewall rule for the following
Public IP
|
Internal IP
|
X.X.X.X
|
10.109.100.102
|
How to:
Allocate Public IP addresses
1.
In Palo Alto Firewall , create
Objects for the respective NAT Mapping
- Login to https://X.X.X.X/php/login.php --> Palo Alto Firewall
- Go to window “Objects --> addresses”
- Klik "Add"
- Fill in the Name, Discription and IP Address
- Go to "Policies --> NAT"
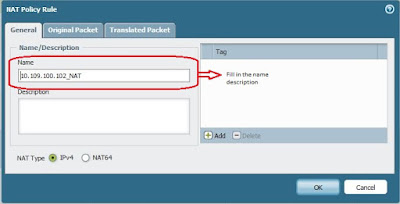
- Click “Add”, go to window general then fill in the name of description
- Then go to window Original Packet
- Choose Source Zone with “Any”
- Choose the Destination Zone, Destination Interface and Service
- Choose Source Addess with the object you have created before, example 10.109.100.102
- Choose Destination Address with “Any”
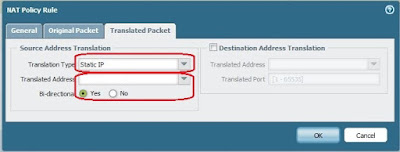
- Then go to window Translated Packet
- Choose Translation Type with “Static IP”
- Choose Translation Address with the IP Public that have been created in “Objects”
- Choose Bi-directional with “yes”
- Go to “Policies --> Security”, Click “Add
- In Window General Fill in the Name/Description
- Then go to window Source, Choose the Source Zone with the interface incoming
- Choose the Source Address with the IP address source
- Go to window “Destination”, in this section you must choose the Destination Zone that mean your Destination Interface and The Destination Address, you can choose with “Any” if you destination want able to access all network. Or you can specify the destination address by click “Add”
- Go to window Action, in this section you can choose the rule “allow” or “ deny”
- Then Click "Save"
- "Commit" the change to enable it
You can manage the service in NAT Policy Rule or Firewall Policy Rule the port TCP/UDP you want open or allow.


No comments:
Post a Comment